Continuing with the jQuery FullCalendar plugin, which was introduced in the previous article on installation and localization, this guide will cover adding, editing, and deleting events stored in a MySQL database.
Adding events
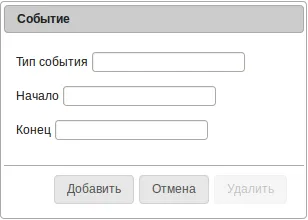
So, we already have FullCalendar installed and configured. To add events, we first need to create a form for entering data.
<button id="add_event_button">Add Event</button>
<div id="dialog-form" title="Event">
    <form>
        <p><label for="event_type">Event Type</label>
        <input type="text" id="event_type" name="event_type" value=""></p>
        <p><label for="event_start">Start</label>
        <input type="text" name="event_start" id="event_start"/></p>
        <p><label for="event_end">End</label>
        <input type="text" name="event_end" id="event_end"/></p>
        <input type="hidden" name="event_id" id="event_id" value="">
    </form>
</div>
Creating a modal dialog form
First, we will turn this form into a modal dialog window using jQuery UI Dialog and add four buttons: Add, Edit, Delete, and Cancel.
form.dialog({
    autoOpen: false,
    buttons: [{
        id: 'add',
        text: 'Add',
        click: function() {
            // some code
        }
    },
    {   id: 'edit',
        text: 'Edit',
        click: function() {
            // some code
        }
    },
    {   id: 'cancel',
        text: 'Cancel',
        click: function() {
            $(this).dialog('close');
            emptyForm();
        }
    },
    {   id: 'delete',
        text: 'Delete',
        click: function() {
            // some code
        },
        disabled: true
    }]
});
Setting up form variables and functions
Next, we will create variables to access form fields, configure the event handler for the Add Event button, and define a function emptyForm to clear form values. Additionally, we will create the formOpen function, which takes the mode parameter:
- add - adding an event
- edit - editing an event
var event_start = $('#event_start');
var event_end = $('#event_end');
var event_type = $('#event_type');
var calendar = $('#calendar');
var form = $('#dialog-form');
var event_id = $('#event_id');
var format = "MM/dd/yyyy HH:mm";
$('#add_event_button').button().click(function(){
formOpen('add');
});
function emptyForm() {
event_start.val("");
event_end.val("");
event_type.val("");
event_id.val("");
}
function formOpen(mode) {
if(mode == 'add') {
$('#add').show();
$('#edit').hide();
$("#delete").button("option", "disabled", true);
}
else if(mode == 'edit') {
$('#edit').show();
$('#add').hide();
$("#delete").button("option", "disabled", false);
}
form.dialog('open');
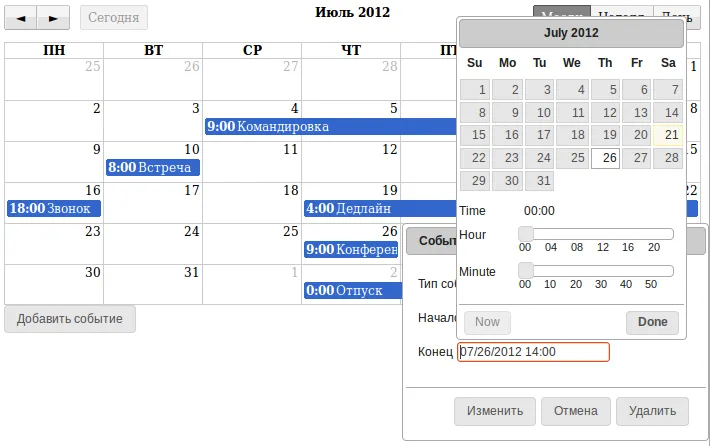
}Now, when clicking the Add Event button, the following dialog window will appear:
Using Datepicker and Timepicker
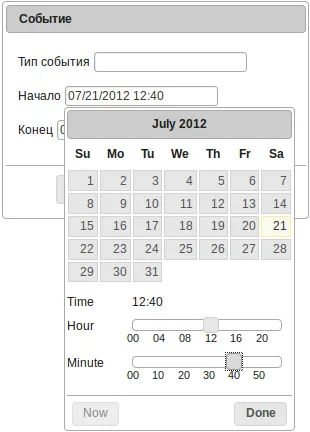
For easier data entry, I suggest using jQuery UI Datepicker with a small modification. To do this, download the Timepicker plugin from the official website and connect it to the script. After that, activate Datetimepicker for the Start and End fields.
event_start.datetimepicker({hourGrid: 4, minuteGrid: 10, dateFormat: 'mm/dd/yy'});
event_end.datetimepicker({hourGrid: 4, minuteGrid: 10, dateFormat: 'mm/dd/yy'});
Thanks to Timepicker, selecting a date and time will become even more convenient.
Handling event clicks
We will also add event handling for clicking on a specific day in the calendar using dayClick, so that the event creation form opens with the selected date pre-filled. To achieve this, we will add event handling in the calendar initialization:
dayClick: function(date, allDay, jsEvent, view) {
    var newDate = $.fullCalendar.formatDate(date, format);
    event_start.val(newDate);
    event_end.val(newDate);
    formOpen('add');
}
Storing events in MySQL
The event creation form is now ready. The next step is to process the form data. First, we will create a database and a table with the required structure:
CREATE DATABASE fullcalendar;
CREATE TABLE events (
id INT NOT NULL AUTO_INCREMENT PRIMARY KEY,
start DATETIME, end DATETIME,
type VARCHAR(20));
Modify the definition of the Add button in the dialog form by adding the event handler logic:
{
    id: 'add',
    text: 'Add',
    click: function() {
        $.ajax({
            type: "POST",
            url: "ajax.php",
            data: {
                start: event_start.val(),
                end: event_end.val(),
                type: event_type.val(),
                op: 'add'
            },
            success: function(id){
                calendar.fullCalendar('renderEvent', {
                    id: id,
                    title: event_type.val(),
                    start: event_start.val(),
                    end: event_end.val(),
                    allDay: false
                });
            }
        });
        emptyForm();
    }
}
This code extracts data from the form and sends an AJAX request to the ajax.php script with the operation parameter op: 'add'. After a successful request, the renderEvent function is called to add the event directly to the calendar.
The second parameter passed is an Event object, which consists of intuitive properties. The allDay property of the Event object indicates whether the event lasts all day. If set to false, the calendar will display the event time next to the title.
The following is the content of ajax.php for adding a record to the database:
$db = mysql_pconnect('localhost', 'rootuser', '123852');
mysql_select_db('fullcalendar');

/* Solve the issue with non-english characters */
mysql_query("SET NAMES 'utf8'");

$start = $_POST['start'];
$end = $_POST['end'];
$type = $_POST['type'];
$op = $_POST['op'];
$id = $_POST['id'];

switch ($op) {
    case 'add':
        $sql = 'INSERT INTO events (
                start,
                end,
                type)
                VALUES
                ("' . date("Y-m-d H:i:s", strtotime($start)) . '",
                "' . date("Y-m-d H:i:s", strtotime($end)) . '",
                "' . $type . '")';
        if (mysql_query($sql)) {
            echo mysql_insert_id();
        }
        break;
}
We connect to the database, extract data from POST, create an SQL query, and execute it, converting date and time into MySQL Datetime format beforehand. This completes the functional part of adding an event.
With this, events can be dynamically added and will immediately appear on the calendar.
Loading events from database
We have learned how to add data. Now, we need to display it on the calendar not only when adding but also when loading the page. To do this, we will add a data source to the calendar initialization:
eventSources: [{
    url: 'ajax.php',
    type: 'POST',
    data: {
        op: 'source'
    },
    error: function() {
        alert('Error connecting to data source!');
    }
}]
This code makes an AJAX request, passing the parameter op: 'source'. We will add a data return operation in JSON format to the ajax.php file:
case 'source':
    $sql = 'SELECT * FROM events';
    $result = mysql_query($sql);
    $json = Array();
    while ($row = mysql_fetch_assoc($result)) {
        $json[] = array(
            'id' => $row['id'],
            'title' => $row['type'],
            'start' => $row['start'],
            'end' => $row['end'],
            'allDay' => false
        );
    }
    echo json_encode($json);
    break;
First, we retrieve data from the database, form an array, and return it in JSON format. After this, all added events will be displayed on the calendar when it loads.
Editing events
To edit events, we will use the eventClick function. For this, we will add handling code to the calendar initialization, which fills the form with the event properties and opens a dialog window with the parameter edit.
eventClick: function(calEvent, jsEvent, view) {
    event_id.val(calEvent.id);
    event_type.val(calEvent.title);
    event_start.val($.fullCalendar.formatDate(calEvent.start, format));
    event_end.val($.fullCalendar.formatDate(calEvent.end, format));
    formOpen('edit');
}
We will also add handling for the Edit button click in the form.
{   id: 'edit',
    text: 'Edit',
    click: function() {
        $.ajax({
            type: "POST",
            url: "ajax.php",
            data: {
                id: event_id.val(),
                start: event_start.val(),
                end: event_end.val(),
                type: event_type.val(),
                op: 'edit'
            },
            success: function(id){
                calendar.fullCalendar('refetchEvents');
            }
        });
        $(this).dialog('close');
        emptyForm();
    }
}
The code is very similar to adding an event, but it differs by using the operation op: 'edit' and including the event id in the transmitted data. Also, after a successful AJAX operation, we call the calendar function refetchEvents to retrieve information for all events again, updating the calendar data.
The ajax.php file code for updating data:
case 'edit':
    $sql = 'UPDATE events SET start = "'.date("Y-m-d H:i:s", strtotime($start)).'",
        end = "' . date("Y-m-d H:i:s", strtotime($end)) . '",
        type = "' . $type . '"
        WHERE id = "' . $id . '"';
    if (mysql_query($sql)) {
        echo $id;
    }
    break;
Now we can dynamically modify event properties, including their names, start dates, and end dates.
Deleting events
To delete an event, we need to open the form in edit mode by clicking on a specific event. The form includes a Delete button. We will add a handler for the button click:
{   id: 'delete',
    text: 'Delete',
    click: function() {
        $.ajax({
            type: "POST",
            url: "ajax.php",
            data: {
                id: event_id.val(),
                op: 'delete'
            },
            success: function(id){
                calendar.fullCalendar('removeEvents', id);
            }
        });
        $(this).dialog('close');
        emptyForm();
    },
    disabled: true
}
Here, we pass only the event id and the operation type op: 'delete' to the script. After the request is successfully executed, we call the removeEvents function and pass the id of the deleted event. This is necessary to remove the event from the calendar.
The ajax.php file code for deleting an event:
case 'delete':
    $sql = 'DELETE FROM events WHERE id = "' . $id . '"';
    if (mysql_query($sql)) {
        echo $id;
    }
    break;
As a result, we have a fully functional calendar with extensive features. It allows adding and modifying data using a convenient form, as well as deleting events in edit mode. This is just a small part of what FullCalendar can do.